Showing posts with label Gstring Climbing Grips. Show all posts

Friday, February 14, 2014

Lowering Gstrings for Additional Exercises

Gstrings are incredibly versatile. However, I suspect that most users don't utilize them to their maximum potential, and most people have probably not tried the exercises shown below because of the need to lower the Gstrings. For more discussion of these exercises and positions go here and scroll down to Building block exercises and Core strengthening.

               
hanging push-up       
mantle / press-up
       
overhang pull-up
undercling step-up


Lowering the Gstrings can seem like an extra hassle, but with one of the methods listed below it's quite easy and uses very little extra equipment. Here are seven possible ways of lowering your Gstrings. Each has its own pros and cons. Hopefully you can find one that suits your requirements:
  1. CARGO TIE-DOWN STRAPS ($7-$30) - Purchase from a hardware or large department store.  PROS: quick release buckles makes it easy to adjust; no need for 'biner to attach the grips if they come with a "J" hook on at least one of the ends. CONS: Extra tail or loop (depending upon configuration) hangs down; cost; made for holding cargo, not humans. The ratings are way beyond the stresses exerted on them by hanging or doing pull-ups, however use at your own risk. 
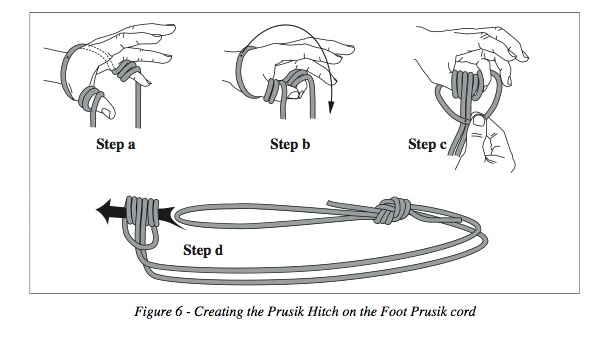
  2. PURCELL PRUSIK - Make from 5mm-7mm accessory cord. First tie the ends with a Frost Knot or a Figure Eight to form a hang loop. Then proceed according to the linked diagram to tie the Prusik on the loop of cord.: PROS: nice and neat - no loose ends hanging down; quick to adjust; can also be used as an adjustable tether at belay stations for multi-pitch climbing. CONS: limited adjustment range; uses almost twice as much rope as the blake-hitch method; 'biner is needed to connect grips. 
  3. BLAKE HITCH - Made from 5mm-7mm accessory cord with Figure-Eight on the bight to form a loop to hang grips from. PROS: wide range of adjustment; uses smaller length of cord than Purcell Prusik option. CONS: extra tail hanging down; length can only be adjusted up to half its tied length; 'biner is needed to connect Gstrings.T
  4. CLIMBING ROPE + PRUSIK - Use a piece of old climbing rope with figure-eight loop for hanging and an overhand stopper knot in the end. Then attach a small Prusik Loop made with 5mm-7mm accessory cord to slide up and down the rope for adjustability. PROS: Simple to tie and set up; widest range of adjustments possible for a given length of cord; climbing rope piece can also be used for Chris Parson's workout. CONS: extra tail always hangs down; 'biner needed to connect Gstrings.
  5. CLIMBING SLING - Use a climbing sling (double length is probably best) with an overhand knot(s) to adjust the length and/or add a fixed position or two for different exercises. PROS: most trad climbers already have slings; simplest; fullproof and secure - no worries of a friction knot slipping. CONS: least adjustable; need to tie extra over-hand knots for additional mounting points; need 'biner to connect Gstrings.
  6. TIED LOOP of ACCESSORY CORD or TIED SLING OF WEBBING - Use a Double Fisherman's Bend (cord) or Water Knot (webbing) to make loop. Tie additional over-hand knots along loop to make multiple clip-in points if desired. PROS: most climbers have extra cord or webbing lying around; foolproof and secure - no worries of a friction knot slipping; simple. CONS: not adjustable on the fly; need 'biner to connect Gstrings.
  7. DAISY CHAINS - Only if you happen to have two daisy chains already. PROS: simple and effective CONS: Expensive if you have to buy them; may not lower the grips as far as desired for some of the exercises.


If you're tying your own loop with cord or webbing, you'll need to figure out the maximum amount of cord needed so the grips will hang at the lowest position desired. Remember to take into account the length of the grips including the hang loop and 'biner. Also, remember that you'll need significantly more cord to allow for knots. Prusiks, Figure Eight, Blake Hitches, Frost, and Water Knots all use a considerable amount of extra cord.

Hopefully this will give a range of ideas for how to lower your Gstrings and experience more of their versatility. If you have other methods for lowering your Gstrings - please let us know!

NOTE: When using Gstrings in a horizontal or prone position make sure to use some type of padding underneath you as a safety precaution.

The security and safety of all knots depend upon: the knowledge of the tier; the knot being properly dressed; using the proper type and size of cord; and the strength of the anchor point.

Tuesday, November 19, 2013

Making a Gstring Backboard

SICgrips is committed to innovating and providing the most versatile training products for climbers. Our goal from the beginning has been to target products for people who aren’t able to put up a home climbing wall, who travel a lot, who want an alternative to the traditional hangboard, or who want more flexibility in mounting. This includes those (like students, renters, or those with fussy partners!) who can’t or don’t want to put holes in their walls. :-) When it's possible to feasibly market these products, we will. When it's not feasible for whatever reason, then we’ll provide basic instructions for the do-it-yourself types to make themselves. This is the first of several projects that we'll share over the next few months.

Gstring Backboard features:

  • provides a higher mounting point for the Gstrings, allowing more clearance for hanging
  • easy to put up and take down
  • provides a semi-rigid mount so Gstrings are similar to actual rock or hang boards.
  • stores easily behind an open door, in a closet or underneath a bed
  • easy to mount and dismount the Gstrings
  • cheap to make


While there are both permanent and temporary ways to mount Gstrings, we've heard from some users that when Gstrings are hung from a doorway pull-up bar, they don't have enough clearance to hang even with bent knees. The Gstring Backboard is one way to address this issue. It requires one of the many versions of popular doorway pull-up bars that cam and apply pressure to the top and front of the doorway trim and are easy to put up and take down. Many climbers already have one but if you don't, they can be purchased for $15-30 from sporting goods or department stores, or Ebay.

Items needed 
(total cost ~$15 depending upon what you have on hand):

  • modified Iron Gym-type pull-up bar (see below)
  • basic hand or power wood- and metal-working tools
  • 2' x 2' x ¾" piece of birch plywood (or equiv. hardwood)
  • 2" x 2" x 10' pine for Backboard frame and crossbar
  • #8 wood screws or 1 ½" nails
  • 2 pcs. - 5/16 " x 2 ½" lag screws (hang bolts for Gstring hang loops)
  • wood glue
  • 2 pcs. - ⅛" x  1.5" x 4" mild steel for pivot plates (available from your local hardware store in a 3' long strip)
  • 2 pcs. - ¼" x 2 ½ " hanger bolts with wing nuts and large washers for pivot plate
  • 2 pcs. - ¼  x 2" lag bolts with washers for pivot plate

Instructions
(This won't be a comprehensive step-by-step set of instructions because the Backboard is fairly simple to make. I'll cover a few specific things that may not be obvious.)

Modifying pull bar:


The dimensions given here are based on the doorway in my home. You’ll need to modify to fit your specific situation.
Remove the foam padding from indicated areas. Cut the horizontal handles off the pull-up bar with a hack saw or saber saw with a metal cutting blade, so there’s ¾" left beyond the center of the bolt hole. The photo shows ⅞", however ¾" is probably better so that it's doesn't run into the plywood backboard when mounted. (With the handles cut off, it can still be used as a pull-up bar using the center foam grip position).


Reverse the horizontal crossbar. Instead of it attaching to the bottom of the curved uprights (the normal way), attach it to the top of the crossbar. This will raise the backboard 2".


Cut plywood to 16" x 24". It could be made a bit taller (18" x 24") or it could be made slightly smaller 14" x 24"). If you have a wider piece of plywood, it could also be made as wide as your doorway). If you’re using the Backboard with the Gstring PROs, it will need to be at least 16” - 17” tall.


Drill a 1" hole in the vertical frame supports exactly in the middle lengthwise. Drill it so the edge of the hole is even with the edge of the wood. Remove excess from hole to edge of wood so that it becomes a 1" slot to slide onto the pull-up crossbar.


Drill a 5/16" hole in the pivot plate and then cut out a diagonal slot from the edge of the plate to the hole. This may need to be a little wider than 5/16" at the edge so it can pivot on the bolt and lock with the wingnut. The plate pivots open to mount on the pull-up bar and then close and lock with a couple turns of the wingnut.


Notes:
  • A washer was added to the hang loop to protect it from threads on the Backboard hang bolt. Then the hang loop was re-tied to make it as small as possible.
  • I added tape to bottom of board so the edge is more visible - anyone 5'11" or taller needs to duck :-)
  • I added a strip of yoga mat on ends of horizontal wood bar to protect the doorway from being scratched and dented. 
  • If you use the Backboard with Gstring PROs, you'll want to make sure
    that the board is at least 16"-17" tall because of their length. Instead of a vertically mounted hanger bolt, you'll want to use lag bolts and mount them horizontally at the top of the board face going into the top frame member. This will allow you to conveniently hang the 'biners on them.

Options:
  • t-nuts for mounting resin climbing holds, campus strips, or hangboard
  • a wider piece of plywood (up to width of doorway) can be used, though it will add weight and bulk). No matter what size of backboard you design, the pull-up horizontal bar should always be located in the middle vertically.
  • a set of hardwood edge strips could be added to simulate Eva Lopez's Progression or Transgression boards. Access to a table saw would be needed in order to accurately cut a set. The Gstrings could still be hung and accessed even with the edges if designed correctly. She has a done a lot of research and has come up with an effective finger strength training program based on this type of board. The drawback is that it only trains edges. However her blog has a wealth of information for training in general.

You might want to check our website to see examples of other non-permanent alternatives for mounting Gstrings if you haven’t already seen them :
In the near future we'll include instructions for how to make a similar type doorway mounted backboard, that doesn't use a pull-up bar. Stay tuned.

Disclaimer:
Make and use at your own risk. SICgrips makes no claims, explicit or implied, as to the safety of the Backboard for you and your situation because there are too many variables, including: strength of door frame casing; strength of doorway trim; climber’s weight and how the climber uses the backboard; what brand of pull-up bar is used and its strength rating; and the size, construction quality and materials used. When using the Backboard, do not use huge dynamic moments as it could stress the Backboard, pull-bar, and doorway beyond what it can hold. I am fairly light (135 lb.) so my use is not a good "yardstick" by which to determine your use of it. You can do a "hillbilly" test to help determine the strength of doorway trim by doing finger pull-ups on it to see how it reacts. This will stress it more than the backboard will. Gstring Climbing Grips are rated for climbers weighing 225 lb. or less. Therefore the Gstring Backboard combination should be below that limit. However, due to other factors mentioned above, it could be even less.


Monday, July 1, 2013

Gstring Climbing Grips Videos

These videos have been announced on our Gstring Facebook page and have also been integrated into the SICgrips website. However, if you're a reader of the blog and haven't seen them yet, the following short videos may be of interest.

We spent a week in Missoula climbing, rafting and shooting these videos. The goal was to create several short videos that document what's already on the website such as grips positions, adjusting Gstrings and suggestions for exercises to use in a training program. Some people would rather see it in video form than photos and text. Also, it helps create more buzz by having them up on youTube and in a form that can easily be passed around.

We also wanted to create a short video showing the uniqueness of the grips while illustrating our product tag line: 'Less is More'. Since I didn't have any creative ideas, I gave my son complete creative freedom to come up with something ~30seconds that illustrate the 'less is more' concept. Well he did that in a very unique way and which also ties it into the double entendre unique to the product name. Imagine my surprise when I got a rough cut of this! Please be aware that the first video may not be suitable to play in a work environment.


Monday, April 22, 2013

How to Set Gstring Climbing Grips Back to the Same Angle

The local rock monkeys work'n the Gstrings on the Gallows prototype

Some users have mentioned that it's a challenge to consistently set the Gstrings back to the exact same position used in the last training session. While it can be done by trial and error, the following method can help aid this process and make it simpler, quicker and more consistent.

For example, say you're training on the crimpers. Since the rotation of the grips determines the difficulty of the crimp (because they're ellipses and contact area varies), it's important that you get the grips consistently back to the same angle so that you're training the same degree of difficulty each session.

When you find a grip position that you'd like to train, hang the grip and double check that it's the exact angle you desire, then tighten the Prussik knot. Take the grips down and use a fine or medium tip marker and put marks along both sides of the Prussik knot on the cords of the 3D-Sling like this:


This will result in four small marks - two on each side of the Prussik knot:


Take the second grip and adjust it so that it hangs exactly the same as the first one. Then mark it like you did the first grip.

Now when you change the grips to different positions, you'll see four marks along the 3D-Sling that should look like this:


Whenever you desire to return to the grips to the previous position you were training, you'll have these marks as reference points to set the grips back to that position. It's simple to loosen the Prussik knot and slide the hang loop back and forth along the 3D-Sling until the marks line up with two on each side of the Prussik knot just as had when you first marked them. The grip will hang at exactly the same angle as before:


If you want to mark several different grip positions, it could become confusing with several sets of marks all the same color. If you find yourself in that situation, you may want to use different color markers for each position. For example: black for one position, red for another, dark blue for another,  and green for another.

As you continue to sue them over time, you may find that it becomes easier to adjust them and that you rely less on the marks. However, if you're into a serious training program where it's critical to have them set exactly the same as before, the marks will enable you to consistently do that.

Thursday, March 28, 2013

Chris Webb Parson’s 30-Minute Finger Strength Program


Chris Webb Parsons recently posted a video of his finger strength hangboard program which has generated some interest on the web. Tommy Caldwell even said he’s going to give it a go while he can’t be out on the rock. I thought it would be good to summarize Chris’s program and share with Gstring users as one way to use and benefit from Gstrings. Gstrings offer a number of unique features which can further extend and customize Chris’s program.

Start by watching Chris’s video to become familiar with his basic method. It's a program designed to increase finger and hand strength. Please note the usual cautions and caveats:

  • Don’t start the program if you have having finger, wrist, elbow or shoulder problems.
  • Stop the program if issues start to develop in any of these areas.
  • The program WILL increase finger and hand strength which can lead to developing bad habits by relying on new strength instead of good technique.
  • It can be an excellent way to improve your climbing ability IF integrated with good climbing technique and habits.

His program basically is designed to train flat edge/crimp positions. However, it can be used for any grip position. Other possibilities with Gstrings are any of the pinch or sloper positions. This is an excellent way to train whatever grip position you are weak at. 

< If training a crimp position, Chris recommends using a half-closed crimp. The crimper on Gstrings allow you to easily adjust the difficulty by rotating the grip.

> I personally found that I needed to start with something a bit easier and used the flat edge between the first and second joint position. Then eventually reducing it to the first joint and then transitioning to the crimper. 

For this training you'll only use one Gstring grip because you're focusing on one hand at a time. You’ll need to replace the other Gstring grip with an old piece of climbing rope, webbing, or a sling. A fat old piece of fuzzed climbing rope worked ideal for me.

Choose a grip position that you desire to train and then adjust the difficulty so that you can only hang on for 2 seconds before dropping off due to your grip slipping or hand opening up. The beauty of Gstrings is that once you decide on a grip position, it’s easy to customize the difficulty by adjusting the angle of the grips. If training the flat edge or crimp position you can also modify the difficulty by the degree of contact your fingers have on the grip or how many fingers you use. 

Use the piece of rope to augment the hand being trained by pulling just enough to stay on the grip for 10 full seconds. If you fall off before the 10 seconds finish get right back on and finish out the 10 seconds. At the end of 10 seconds loosen your grip on the rope so the Gstring hand fails by opening or sliding off. In subsequent hangs modify the assistance provided by the rope hand so that you stay on the full 10 seconds. As soon as you finish one hand, switch and start the other hand immediately. After finishing both hands rest 3 minutes then repeat the cycle for a total of 3 times.

Three arm positions are trained each session: arm almost straight but not locked; arm bent less than 90 degrees; and, arm bent more than 90 degrees. The following chart sums up the cycle:

Session schedule  (~30 minutes)

                 straight arm (not locked)
left
right
3 min. rest
repeat cycle 3X
arm bent <90
left
right
3 min. rest
repeat cycle 3X
arm bent >90
left
right
3 min. rest
repeat cycle 3X

Recommended: 2-3 sessions per week with at least 1-2 days between sessions

This is designed to be a 12-week program consisting of two 6-week cycles. As you progress and gain strength you will be able to increase the angle of the grip or reduce the finger contact area so that you remain constant at 2 seconds for the unassisted hang. 

12 week program schedule

week
hang time
1st 6-weeks
hang time
2nd  6-weeks
1
10 seconds
5 seconds
2
10 seconds
5 seconds
3
5 seconds
10 seconds
4
10 seconds
5 seconds
5
max. time without assistance
6
rest
rest

Once you understand the principle and cycles, it’s quite easy to get into the groove and follow the program. It’s great because it’s only takes ~30 minutes per session. By being consistent and keeping a log of finger and grip position and contact area, it's easy to track your progress. 

Let me know if you try this and how it goes, the end results, and any modifications or suggestions or modifications you have after using this method. At the end of the 12-week cycle either take a break, train a different grip position, or increase the difficult of the current position (finger contact area; angle of hold; change to finer grip surface; or add weight).

Chris’s method isolates training to the finger and hands. If you’d like to have a more holistic approach that also involves the core and abs, see some of the exercises listed on the SICgrips website.

Monday, February 11, 2013

RollBar for Finger and Forearm Training

OK, I mentioned that I would explain how to make a RollBar. You're probably thinking "What in the world is a RollBar?" The RollBar is my version of a commercial-type training device. While the bar can be used as a pull-up/chin-up bar, that's not its primarily purpose. The main purpose of the RollBar is to provide another way to train finger, hand and arm muscles through a range of motion from an open hand position to a positive jug position. This is done by grasping the bar like you are going to do a pull-up but then gradually letting your body weight unroll your fingers until you are about to lose your grip and roll off the bar, then roll back up to a full grip. By rolling back and forth, rolling and unrolling your fingers, you can create an incredible forearm pump! It can provide complementary exercises to those done on your Gstring Climbing Grips or hangboard.

It's may be difficult to do this under full body weight (at least for me). However, by resting my heels on the floor in front of me I can control the amount of weight on my arms. Probably a better way to reduce body weight would be to use a pulley reduction system and weights which would allow you more precision and control in reducing the weight. This would require an additional 2 pulleys (sicgrips.com/Endurance.html). Since I use the RollBar more for endurance training for forearms and fingers than for power, I try to maximize repetitions. This means doing it with significantly less than full body weight. I repeat the unroll - rollup cycle as many times as possible with my heels resting on the ground in front of me. After doing as many times as possible, I rest, "rinse" and repeat for a total of 3 cycles. This creates an incredible pump in my forearms similar to climbing a longer route. 

The commercial product (Lapis Rollybar) that sparked the idea for the RollBar had sealed ball bearings inside a resin bar which rotated on an axle. No doubt it's really 'slick' and heavy duty, but at $150+ I can do without the glitz and smoothness as long as it's still functional. 

Besides being cheap, the system I comes with another major advantage - it's easy to insert different diameter bars. While I haven't done it yet, I plan to also make 2" and 4" diameter bars to add variety. Depending upon materials what materials you use and how many of them you already have, the RollBar could easily be made for under $20.

Materials needed:

  • 2 sleeve bearing pulleys. You can also use ball bearing pulleys which provide less friction and make it really smooth, but are quite expensive if you have to go out and buy them.  I used two sleeve bearing pulleys that I had lying around which are often used in climbing/rescue work. If you need to go out and buys pulleys, a cheaper alternative would be the hardware store variety of pulley with sleeve bearings like this. However, they generally aren't as smooth running:
     
  • 6mm accessory cord for making the "belt" and pulley hanging loops. Length varies (see below). 
  • 1" PVC pipe - 24"-30" long (I weigh 135lbs - if you weigh over 150lbs, you may want to change the PVC to a steel pipe or tubing. The exact length needed will vary depending upon where you plan on grabbing it - inside the cord belt, or outside and what the distance is between the cord belts.
  • 3/8" "S" hooks or 2 additional small loops of 6mm accessory cord depending upon whether you'll be hanging the pulleys from a bolt or doorway pull-up bar like this: 
     
Optional:
  • PVC tubing caps (to give a finished look but functionally unnecessary)
  • Several sheets of 220-320 grit sandpaper and contact cement (to provide a friction surface so that it's harder to slip off of bar). 
Construction:
  1. Cut tube to length.
  2. Make two equal sized "pulley belts" from the 6mm accessory cord using a using a water knot or double fisherman's knot. Determine the diameter of "pulley belt" by how low you want the bar to hang below the anchors (lower if you want heels on floor in front of you to take weight off, higher if you want to free hang, and if you plan using a variety or larger diameter bars. A good general size to start with is approximately 5-6" diameter if you plan on using different diameter bars but want it mounted as high as possible. If you're only going to use the 1" bar then it's possible to reduce the diameter even more to 4". If you want your feet on floor in front of you, you may want to increase the diameter to 10"-12" (approximate size shown above).
  3. Spray or brush contact cement on the bar. After a few minutes roll the bar on the paper backing on the sandpaper like a rolling pin. After it's applied, trim off the excess at the seam with a metal straight edge and utility knife. Only apply the sandpaper where your hands will go on the bar. I coated the entire bar with sandpaper (except for the ends where the caps slid on) however I think it would roll smoother if the cord belts rolled on the bare PVC pipe.
  4. Assemble the pieces and hang. See the photos.
Variations:
  • It would be easy to create a 2", 3" and/or 4" RollBar using PVC with the pulleys. The 4" would give a work out that was more like that obtained on slopers.
  • Reversing the hands (chin-up position, palms facing you) and doing the same exercise could work the complementary muscles to help keep everything in balance. This would also help work some of the muscles used in underclings.
Caution:
If you perform the finger roll-unroll with your feet on the floor out in front of you, make sure to have some padding underneath you in case your fingers roll off the bar when your pumped. A bouldering pad works great.
~~~~~~~~~~

Well that's it for this installment. Let me know if you have questions, modifications or additions. In the near future I hope to share some new tips and exercises using the Gstrings which haven't made it onto the website yet.