Tuesday, August 16, 2022

Grigri 3 HUB System for Lead Rope Soloing

 GG3 Cord Mod for Holding Upright and Backwards (HUB System) updated 10/20/24

(For the latest update scroll to the end)


This post will detail the HUB method for LRS. The acronym comes from the Grigri being Held Upside-down and Backwards from how it is normally attached to the belay loop for belaying a lead climber. This has been done for years using various different methods and modifications. I think I remember seeing the Euros doing it decades ago before I saw it here in the US. The HUB Cord method I detail here however is, as far as I know, unique. Over the years I’ve modded GGs different ways to be held up, but so far this seems like the best yet.  I
had four design criteria for attaching it to a chest harness:
  1. Mod needs to be easy to do
  2. Attachment point to the GG needs to be strong - not supported by plastic
  3. The angle that it hangs from the chest harness needs to be adjustable
  4. Cord needs to be kept away from the rope path and the GG handle which could interfere with lock-up
Although I use it with GG3 with a deactivated spring or a GG+ (TRS mode), it's possible to use with other GGs with the spring intact. However this is untested by me and I would wonder about its ability to lock-up in a high-clip situation. Others like Brent Barghahn use a GG3 in the HUB position without modifying the spring (As of My '23 I believe Brent now uses a GG+ in TR mode). Also of note: testing by Yan Camus and others indicate that a GG+ in TR mode and HUB position may not always lock up when weighting it slowly in a high clip situation. Using a GG3 with deactivated spring and the HUB System is the equivalent to a Rock Exotica Soloist or El Mudo but has the added ability to easily lower/rappel without adding or swapping anything out. 
First a discussion of the HUB System vs the Inverted hanging position. I feel the Inverted (hanging facing backwards) GG along with the running cache loop popularized in the last few years, are two of the best innovations for using a GG for LRS. Having said that, there may still be good reasons for some to prefer the HUB system I detail here. 
Ultimately it will depend on what you value most and the type of LRS you do as to which system might be best for you. The purpose of this post is not to convince you of either, but to inform of options…more specifically the HUB option since the Inverted method has been detailed many other places.
Comparing and contrasting the two systems:

HUB System (assumes use with a springless GG or GG+ in TR mode)

Advantages

  • Less possibility of high clip failure - quick and more positive lock up.
  • GG is held higher and in a better position to pull slack for clipping. Especially handy for those with short ape index like me. 
  • Less tendency to flip over backwards because of chest harness however it’s still possible.
  • Less flip-flopping around during a fall, thus reducing the length of fall - up to a foot less. This can be important if you are climbing on vertical or less terrain and there’s objective fall hazards.
  • Can adjust the feed resistance (and thus back-feed) by adjusting angle of the GG with the HUB cord.

Disadvantages

  • It most likely won’t hold a head first fall (unless backed-up - which I consider mandatory). Needs more testing though. Volunteers?! 😊
  • May not feed as well traversing - needs more real world testing.
  • Requires a chest/shoulder sling/harness which is a hassle and may take a bit of effort to get everything fine tuned.
  • Can’t pull rope directly up for a high clip - it will lock instantly and short rope you (springless GG, and GG+). However, if you pull slack down, then clip-up, it works like a charm. Once learned this becomes natural. (It’s the same movement as pulling more slack for the cache loop if you are using that method). Many people who use the Inverted GG method also pull a slack loop down before clipping up and is the norm for a Soloist and an El Mudo

Discussion

Better for vertical to less than vertical routes that don’t wander much and might have objective hazards. It is good for those who want peace of mind that high clips will always lock-up instantly if weighted. It’s a better set up for hang dogging, aid climbing, and routes where the crux is closer to the ground. 

Inverted  GG (Hanging Backwards) 

Advantages

  • Potentially holds inverted falls
  • Feeds fairly well in all orientations because it it free hanging and can orient itself to the direction of rope pull
  • Can pull directly up to clip (depends upon rope pairing)
  • Simpler setup - no necessary mods or chest harness
  • Could be a slightly softer lock-up because of the strong spring

Disadvantages

  • Takes longer to lock up because of it’s hanging orientation: needs to flip 180 degs and travel from the hanging to upright position
  • Not as convenient to pull slack for those with short ape indexes. Have to reach down further to pull slack.
  • Has proven not to lock-up on high clips or when sagging on rope without a significant jerk (as Yann Camus has demonstrated and others have experienced). It needs a significant fall/jerk on rope to lock-up because of the strong spring
  • Depending upon rope pairing, it can lock-up unexpectedly while clipping.

Discussion

Better for steep/overhung routes where there’s no objective fall hazards. Those who want security re the possibility of upside down falls without taking extra measures to protect. It is generally easier system to set up though rope pairing is critical for good feed and lock up
There’s nuances to everything stated here - it’s not cut and dried or black/white. Test, practice and be safe. And as with most all soloing devices, the device/rope pairing is critical and can have a big impact on performance
The GG3 used here is an unsprung version that I’ve modded - but that’s a different story (see my previous blog post). Attaching a cord to the GG upside down and backwards has been done many different ways through the years and range from OK, to klutzy, to dangerous. I’m giving details on how I do it, which works good for me:
  • only requires one hole to be drilled that doesn’t harm the function or integrity of GG 
  • holds the GG at a stable angle that is easily adjustable 
  • is always held by one or more connection points when swapping devices
  • uses the cord connection to the ‘biner to help keep GG from cross-loading on the ‘biner
  • GG is still functional for all normal uses

How to Make the GG HUB Mod (now called the HUBBY system ðŸ˜Š  - Held Upside-Down and Backwards Bridle Yoke)

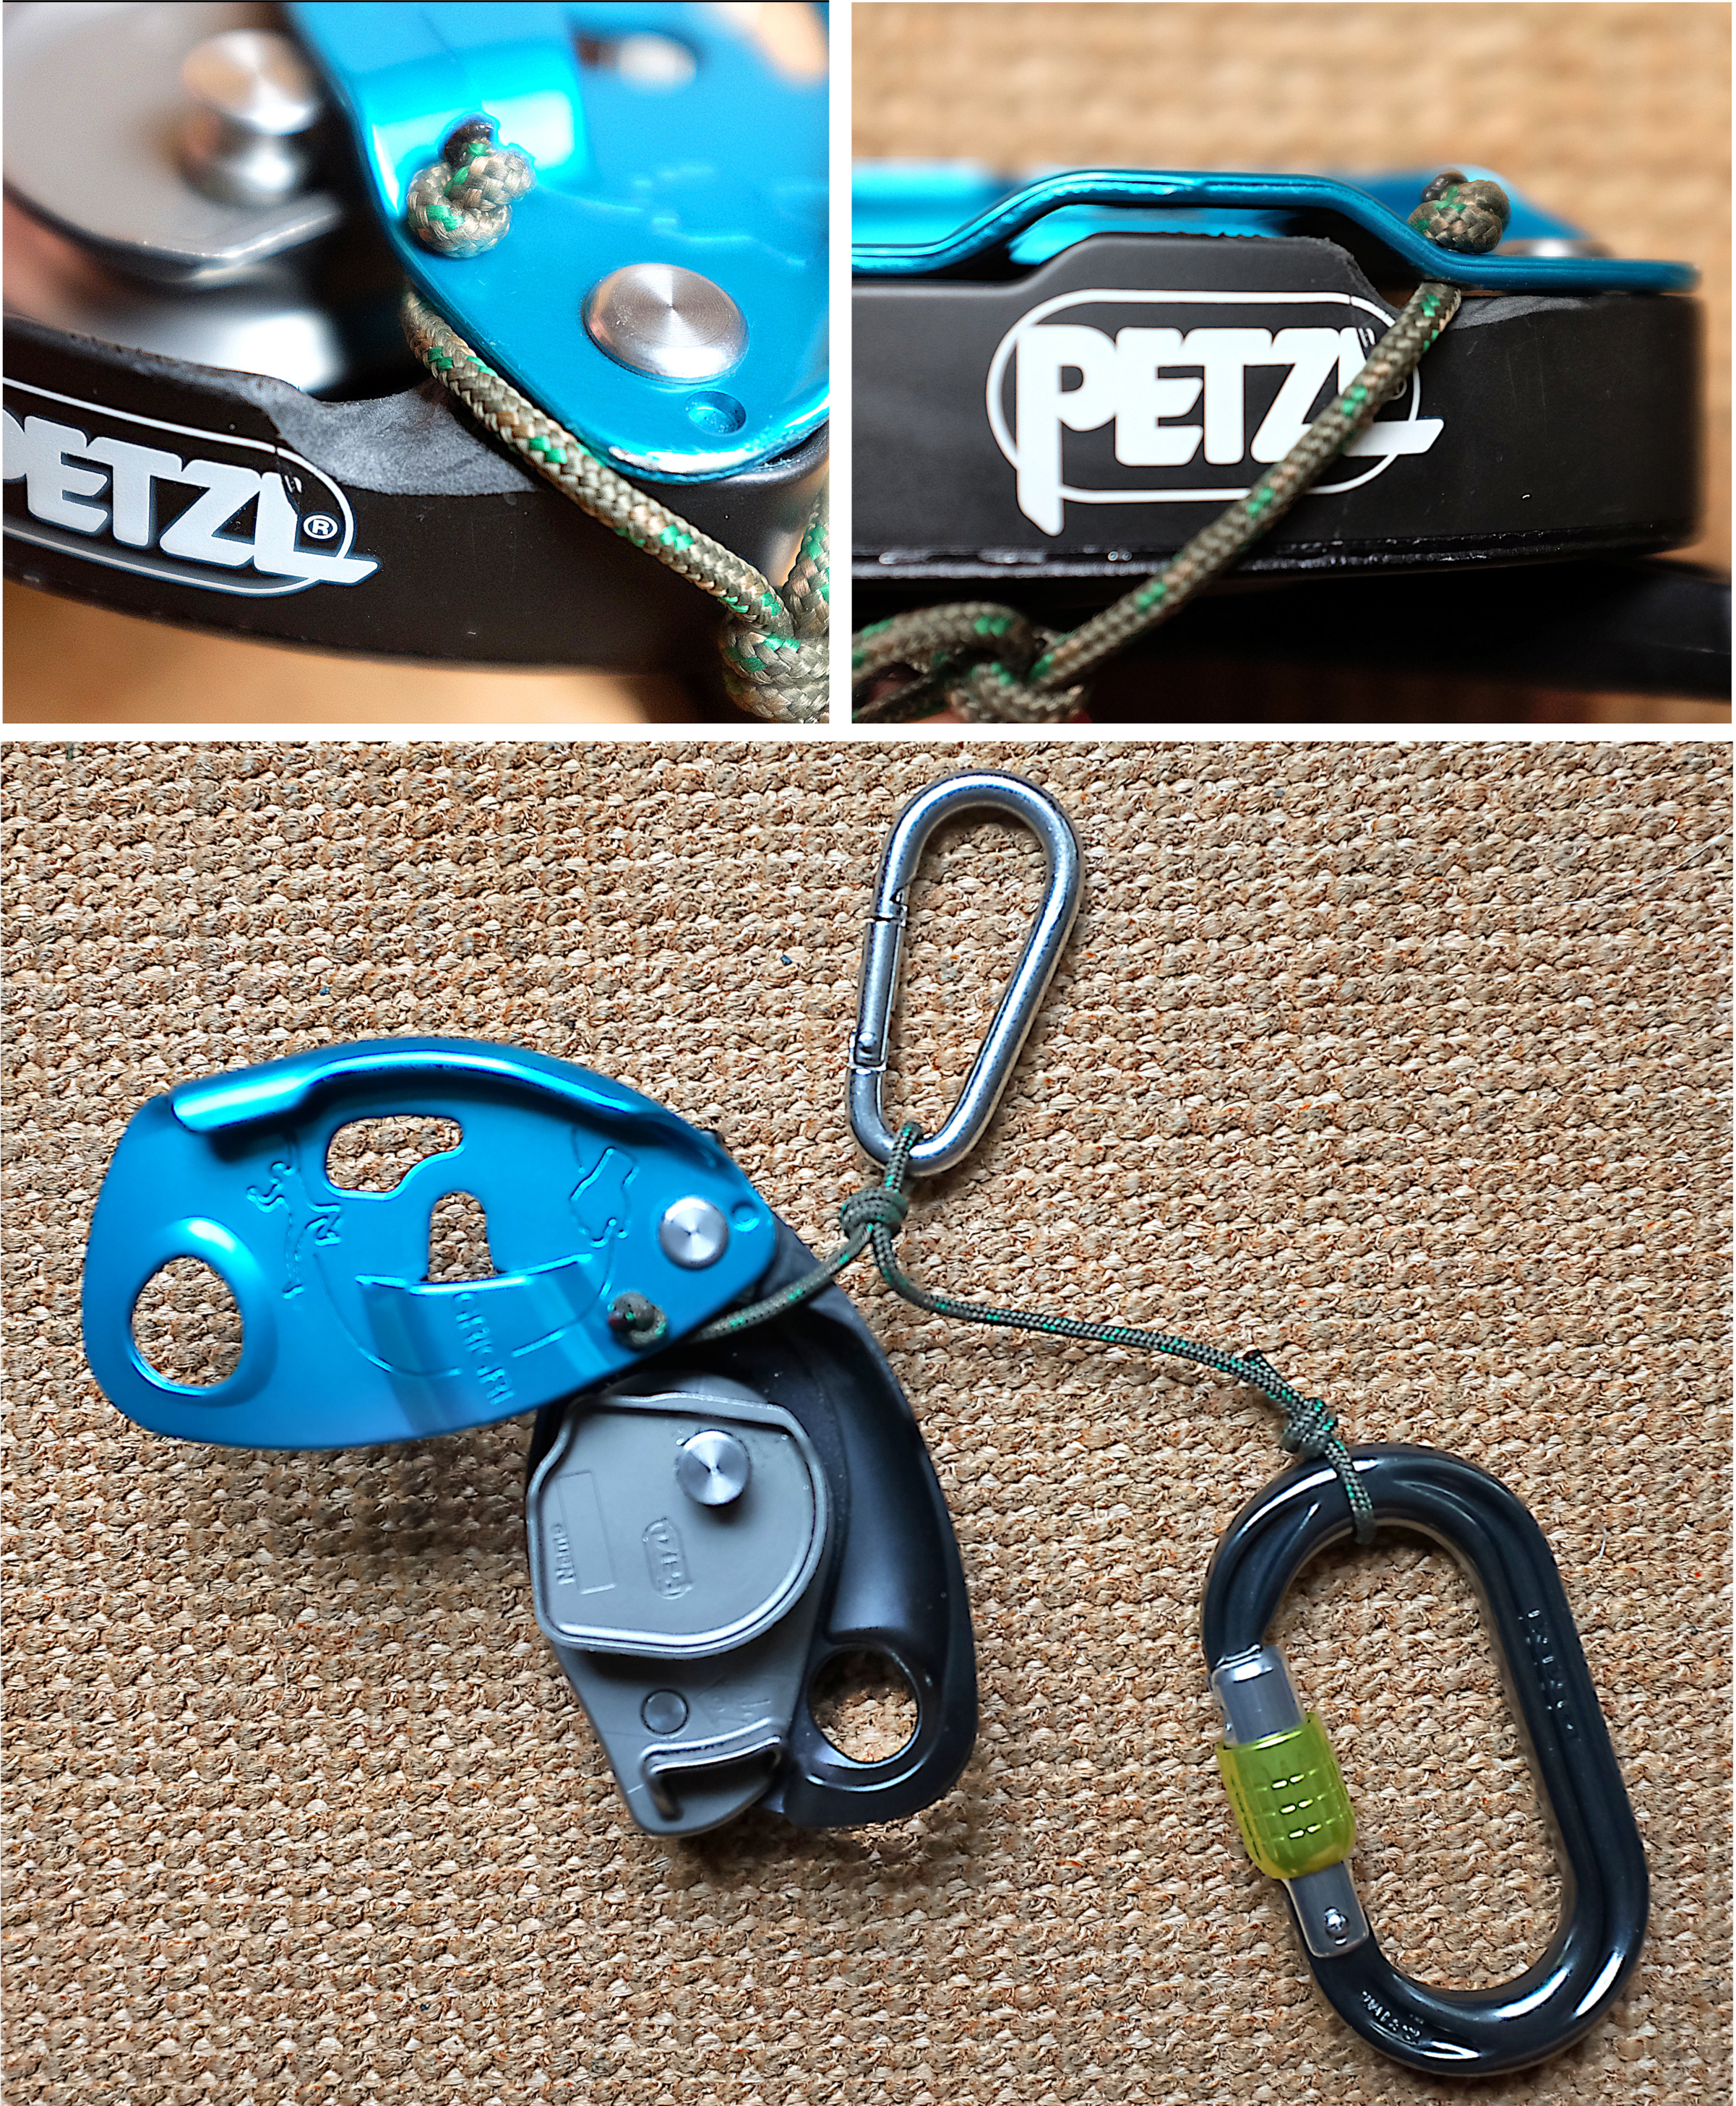
  1. Drill a small 1/8” hole in cover at location shown This does not affect the GG in any way (strength or function). 
  2. Chamfer the edge of the hole on both side so there are no sharp edges to wear on the cord. I used a larger drill bit tip to accomplish this along with a little piece of rolled up 220 emory paper.
  3. Insert one end of a 2.5 mm accessory cord through hole. (I have now transitioned to using 1.8mm polyester covered dyneema. It is more abrasion resistant and just as strong or stronger - see photos for GG+ near the end of the post)
  4. Put an overhand knot in it then burn the end so that there is a melted blob on the end that acts as a stopper. 
  5. The cover of the GG fits loosely so there’s already clearance for the cord. However I sanded the plastic spacer to introduce a bit more clearance so it didn’t bind or rub on a sharp edge and allows the cover to easily open and close. 
  6. On the other end (on ‘biner), I tied a Poacher's knot (half a double fisherman’s knot - see first comment below). This allows it to be loosened to put on the 'biner and then cinched down to help keep the GG centered and prevent cross-loading. The chest harness should also keep the GG upright mitigating cross-loading. (I have stopped using this in favor of a overhand loop on a bight. See description at end fo post)
  7. In the middle of the cord, I tied an overhand on a bight for connection point to the harness to hold it upright. The position of this will determine at what angle the GG hangs at. This will determine how well it feeds. There’s many variables depending upon whether it is an unsprung GG, a GG+ in TR mode or a GG with a normal strong spring. This will be unique for each rope/harness/GG setup and needs experimenting to find the angle for best performance.
See updated info at end of blog post

For the unsprung GG I’ve found that ~30-40 degs from vertical is best for my rope combo for good feed and lockup. For a GG+ I've found 40-50 degs works well. With other GG-rope-harness combo's it takes experimentation to find the best hang/suspend angle of the GG for optimal feed and lock-up.

The photos above show it paired with my new Maxim 9.5 Pinnacle which is sleek, supple, and pretty bitch’n.
For any setup, if the GG feeds too easily it will contribute to back-feed of the live rope. This can be dangerous and pull out dangerous slack from the cache loop. The ease of feed can somewhat be adjusted by changing the location of the overhand knotted hang loop. Increasing the angle toward vertical will increase friction and closer to horizontal will decrease the friction. There are also other ways to manage back-feed on the live rope strand. I won’t go into them here but one of the best and most user friendly is Arctic Bastard’s Gromm Hitches

Five ways to handle cache loop/back-up for HUB system

Having some type of cache loop and back-up are mandatory for good performance and safety. Here’s four possible ways. Each has its own advantages and disadvantages. Choose wisely.
  1. Cache loops pre-tied cloves on ‘biners clipped to gear loops ala Brent Barghahn https://www.brentbarghahn.com/climbing-blog/redpoint-rope-soloing-2021. Use keyless ‘biners and drop loops as needed. Use with a Metolius Super Safe harness or backup gear loops as shown in Brent’s blog.
  2. Cache loop with Microtrax on ‘biner clipped around waist belt. Separate webbing loop with ‘biner near belay loop. Only tie back-up knot on it between MT and GG as needed for cruxes then drop the knot when passed the crux.
  3. ‘Biner around waist belt with a Klemheist tied around rope to manage cache loop and act as backup. If using this method you have to hold knot with teeth while pulling slack ala El Mudo.
  4. Back-up slip knots pre-tied before cache loop. Pull to undo as needed as it nears the Microtrax. Microtrax should be on full strength gear loop or backed up.
  5. Backpack method - backup slip-knots pre-tied at intervals then stuffed in a backpack. Cache loop is pulled/feeds from backpack and backup knots untie as they “appear” by grabbing with mouth and pulling with free hand.
  6. The 

Current thoughts and experiments on using an unsprung Grigri using the HUB System

Current experimentation: Different ‘biners to connect the GG to harness and precautions to prevent cross-loading. How tight or loose the connection should be between chest harness and climbing harness via the GG and HUB cord. Currently, I try to adjust so that the weight is on chest/shoulder harness so it’s hanging as free as possible from the HUB cord. I use a large oval ‘biner to connect to the belay loop. This allows the ‘biner to slide up and down within the belay loop a bit which helps maintain the correct angle while moving around. If the unsprung GG gets into a horizontal position it will lock-up and prevent any upward motion, so beware!

P.S. If a GG is used with a cache loop, it should be on the climbers left. This is on the side of the GG with the moveable plate and has the rounded lip for lowering. If the cache loop is on the climbers right, it can run across the handle and make it harder to access it for lowering.
==================================================

Hub Cord on a GG+

Plastic spacer ground/filed/sanded slightly to increase clearance for 2.5mm cord


Addendum
An alternative way to rig the either the GG3 or GG+ is to eliminate the second arm of the cord is shown below. It is a bit simpler but it will hold the GG at a slight angle sideways which will incrementally increase friction. This setup does not allow you to adjust the angle that the GG hangs at from the chest harness. However for some smaller rope pairings, the feed may be adequate smaller diameter ropes (i.e. <9.4). An advantage of this simplification is that it keeps the HUB cord and harness connection away from the handle.


Addendum #2
I have made several minor changes in the evolution of the HUB cord. First is a change in terminology to distinguish the single leg cord above from the dual leg versions. The single cord I'm calling the HUB Tow cord (shown above), while the second I'm calling the HUB Bridle.

Secondly, I've changed from using 2.5mm accessory cord to a 1.8 polyester/dyneema cord. It fits through the gap between the pivoting cover plate and the body easier than the larger diameter cord.


Thirdly I've changed from using a Scaffold knot that can be cinched down on the 'biner to an overhand on a bight which makes it is easier to put on and take off. I've sized the loop to allow the bulk of the knot to clear the body of the GG which allows the tow loop connection to be better centered (see last photo in the composite above).


Lastly, I failed to show the beveled/chamfered cord hole in the inside cover of the GG. This protects the cord against the sharp edge of the hole. It is done by using a drill bit several sizes larger than the diameter of the hole with a small amount of pressure to remove the sharp edge of the hole and put a light bevel on it.


Note: While some of the photos show an aluminum locking 'biner, I normally used a rated stainless steel quicklink or a auto-locking steel oval or symmetrical pear 'biner.


~~~~~~~~~~~~~~~~~~~~~~~~


For a quick way to test the HUB (HUR) system with your particular GG/rope combo without drilling a hole, you can use a 1.0mm - 1.2 mm dyneema cord. Start with a piece that 3' or so. That's much more than is needed, but makes tying the knots so much easier. The final length of the HUB can be adjust in the knot in the last step.
  1. Wrap the cord around the cover plate's pivot axle and tie a Scaffold knot. Once the Scaffold knot is tied cinch it tight until the cord is worked down in between the cover plate and body. Depending upon how loose your cover plate is, it could take a lot of pressure pulling/tightening it around the axle.
  2. In the middle of the cord tie a clove hitch around the 'biner/clip that you will use to clip it to your chest harness
  3. Take the other end and tie a overhand on a bight which will be used for slipping over the 'biner.
  4. Before securing the bight, adjust the knot/bight for the desired length for hanging from your chest harness.
  5. Trim the excess cord from the ends and burn them.
  6. The hang angle can now be adjust by loosing the clove hitch and lengthening/shortening the relative lengths of the legs of the bridle.
I still prefer my original method of creating the HUB by drilling a small hole in the cover because it helps pull the cover closed. Since the GG doesn't have any kind of cover lock on it, it is free to slop around a bit on the 'biner. The HUB and gravity help exert pressure to keep it closed. 


Friday, August 12, 2022

Deactivating the Spring in a Grigri 3 for Lead Rope Solo


(updated 3/13/23)

This post will share how I disabled the spring on a GG 3 so that it is functionally similar to a Petzl Grillon (a version of Grigri without a spring that is used as an adjustable lanyard). When using a GG with a deactivated spring for lead rope solo with the proper HUB configuration, it can prevent high-clip failure; contribute to more positive lock-ups in general; feed super-smooth; won’t flip-flop around during lock-up; is more convenient to pull slack, and can shorten the distance of a fall depending upon how it is rigged. Even with the mod, it can still be used for TR belaying; lead belaying (you’ll have to hold cam arm down with your thumb when pulling slack); and as an adjustable lanyard like the Grillon. Back in the day I also used one for route setting in a small gym because it allowed me to go up (had to pull slack) and down and instantly locked-up so I could hang and work.

This post will detail my modification, NOT how it can be used for lead rope solo. For more information on that see my blog post on the GG3 HUB (held upside-down and backwards) System for LRS:

Read this!
  • I would encourage you NOT to do this modification. I am only documenting this because people wanted to know how I did it. This should only be done with the proper tools and skills. It’s easy to fuck it up and you’ll likely ruin your GG and/or make it dangerous to use, so don’t try if you aren’t confident and skillful in tool use and making modifications. 
  • Modifying the GG is using it WAY beyond the manufacturer’s design parameters and intended use. LRS is dangerous and can kill you if you don’t know what you’re doing. 
  • Once this modification is made you will not be able to use it in the inverted position for LRS any longer. It can only be used with the HUB system for LRS. Each system has benefits and drawbacks (see my post on the HUB System for LRS.)
  • Alternatives to making this modification that give similar function are: 1) Using a GG+ in the Tope Rope mode (weak spring setting) and get most of the functionality of this modification. The downside is you have to put up with the anti-panic handle which is a PITA IMO and the lock-up is not as immediate.


IF you could disassemble the GG (you can't without destroying the axle), this is what you'd see. The photo is for informational purposes only so that you can see the construction of the GG. To deactivate the spring, the GG and axle do not need to be disassembled. This shows the spring inside that provides tension to the cam arm. My goal was to grind off the end of the spring that's sticking up (blurry in photo) so that the spring tension is released. The following steps tell how I did it without destroying the GG or having to remove the axle.

Steps for deactivating the spring on a GG3 (others models are different and these steps do not apply to them)


1. Take out tiny screw from corner of plastic cover. Insert a super thin piece of plastic (cottage cheese or yogurt carton lid) underneath it till it is stopped by the axle (this is to protect the finish on the Grigri). I inserted a large flat blade screw driver between the black plastic cover and credit card toward axle as far as possible. Twist the screw driver blade so that it will eventually pop off the black cover over the lip of axle. It will take a fair bit of force.


2. Once cover is off, it will expose the end of the spring sticking up through the side plate. Use a cotton swap, toothpick, or wooden match  to get out as much grease as possible


3.  Second warning: this is a very delicate operation and it’s easy to ruin your GG. I used an 1/8” carbide ball bit in a Dremel tool. Insert bit through opening and try to gradually grind the end of the spring below the level of the side plate. This is a slow process and takes precision, patience and a steady hand. Make sure to wear eye protection - bits of grindings will be flying everywhere. Also when you’re almost through the spring, the small end piece sticking up will snap off and go flying because it’s under significant pressure.


5.  Once the end is ground off, the tension of the spring will be released inside of GG. Note: If you don’t grind the end of the spring below the level of the side plate, it may still rub on the underside of the plate and the cam arm will not be as free to move as it should be. So make sure you grind the end of the spring as low as possible (tricky). Use a cotton swab to clean out as much grease and grinding bits as you can. There could be some fine grindings that you can’t get out but they don’t interfere with the action of the GG. The spring remains inside the housing but it doesn’t affect the use of it because it’s not attached to anything. At this point the cam arm should be free to rotate in both directions fairly


6.  Grind or sand half the thin, narrow lip off of plastic cover as shown in red below so that it’s easy to insert back over the end of axle flange.


7.   After putting the plastic cover on over axle flange, slide into place so hole in cover lines up with the hole in the side plate making sure the remaining lip of the plastic cover slides underneath the axle flange. Put the screw back in and carefully tighten. Be careful not to over-tighten because the screw’s threads are only going into the plastic spacer below the metal side plate. 


It should look and function like before except is no spring pressure to overcome. The cam arm should be free to swing open and closed with little or no resistance so that, in combo with the HUB cord and ropes of 9.5 or less should feed fairly freely. If there is too much friction you can play with the HUB cord so that it hangs at around a 45 deg angle. Should there still be too much friction there is one last mod that is possible that’s detailed in my next blog post.


8.   The unsprung GG can still be used for TR belay and bringing up a second as before. However for lead belaying you will need to hold cam arm down with your right thumb while pulling slack for the leader. For how to rig the GG3 for lead rope soloing, see this blog post.


Wednesday, June 22, 2022

Self-Belay System for Home Climbing Wall

Most home walls are low enough that they can be use for bouldering with or without pads. My son is finishing up his house in the Bitterroot Valley and has dedicated a whole room for training during the cold months and when he can't make it out to the nearby crags and walls. His bouldering room is 20' x 30' with a 40 deg Moon Board at the "low" end of the room and an almost 20' tall 20 deg. wall at the tall end. For now he just has home made 2x4 holds so he can test the wall and the setup discussed below. The two end walls are connected by a 30' long vertical traverse wall. I'm jealous! 😊


The tall wall is high enough that you really don't want to fall off so is really a TR wall. However that requires a belayer and with a small child, it means that he or his wife often has to babysit so only one can climb at a time. Sooo...what to do? With a bit of adaptation, we figured out a good system for self-belaying by adapting a top rope solo system I've been using off and on for several years (https://sicgrips.blogspot.com/2020/08/vergo-for-top-rope-soloing.html). It allows the climber to fall/hang at any point, then continue climbing or lower down. Who needs a $2.5K+ TruBlue iQ system! (They are great systems though.) This accomplishes the same thing at a fraction of the price.

The main challenge we faced when adapting the system from outdoor climbing to indoor is the angle of the wall. Top rope soloing is a wonderful way to gain endurance by doing laps or for working on cruxes for a project. However it does have its limitations. TRSing feeds best when vertical. When it gets too overhung, or wanders/traverses too much, then it becomes less than ideal. Re-belays are the solution when climbing outdoors to help the rope run free and to protect it against edges.


My son's indoor wall is 20 degrees overhung which causes the rope to seek a plumb line to the ground because of gravity. This has two negative effects. It means the rope tends to hang up on your body which creates friction and doesn't allow it to feed freely. Secondly, it creates a downward and outward pull on you because of the weight at the bottom of the rope.  This is annoying and a PITA to say the least and can feel like someone is trying to pull you off the wall.

So we've adapted the re-belay idea from outdoors to the indoor wall by placing an eye bolt near the bottom of the route and running the rope through it. This keeps it close to the wall, away from your body and allows the Vergo to flow easily up the rope.

The keys to optimizing the system for him in this contect are:

  1. tow loop on the Vergo and chest sling to hold it vertically (very difficult feed otherwise)
  2. a ~9.5mm very flexible and pliable rope
  3. eyebolt to hold rope close to the angle of the wall
  4. adding the minimal amount of weight on the bottom of the rope so Vergo feeds well but does not impede climbing
Things to improve in the future:

Replace eyebolt with a pulley at the bottom to increase the smoothness and efficiency of the weight on the rope and pulling and slackening of the rope as one climbs and assumes various body position in relation to line of the route. 

Because this method uses a fixed top anchor, it doesn't allow you to wander too far from the route line. Therefore we're thinking of attaching the rope to a pulley at the top which would run on a horizontal static line across the wall. This would allow it to track/follow the climber's horizontal movement if the they "wander" around the wall. This would be paired with a horizontal line (non-weight bearing) at the bottom of the wall at the same height of the eyebolt which would include two pulleys connected by a swivel. One pulley for the climbing rope to to pass through to replace the eye bolt. And the other so it can easily slide horizontally to hold rope close to the wall but follow climber's horizontal movement like the top anchor rope set up. (Difficult to describe in words without taking the time to draw it out).

The main challenge in this scheme is that the top horizontal static anchor rope would be stretched between two points (like a slack line) and any "fall"/weighting of the climbing rope/pulley would multiply the weight of the "fall" by an X factor due to the physics of the shallow angle created by climber's weight sagging on the horizontal rope (like a slack liner fall). 

The proof of the pudding however, will be in the final product. I'll add a future post when/if we perfect that. However as it stands it's a good and reliable setup for a single route that doesn't wander.
__________________________

NOTE: The photos/video above show a Climbtech RollnLock at the back-up. I've also used a Microtraxion which works similarly, thought if the two devices contact each other, because of the MT's teeth, it is hard to release and descend without first unweighting it. Some say that the Rollnlock will not lock up if it contacts the primary device above it. That's not been my experience.

This article shows non-standard and non-approved use of these devices. Be warned and use at your own risk. Climbing is dangerous!


Monday, May 30, 2022

Descending or Bailing from a Top Rope Solo

 Descending or Bailing from a Top Rope Solo


Technique for descending from a hanging top-out or anywhere mid-route without taking off TRS devices, using an ascender, or friction hitches. This is fairly advanced and not recommended if you're new to top rope soloing.

(Apologies - this would be much easier to show by a short video but I’m not a video person. I shot the photos and wrote the rough draft a couple years ago and since then most photos were accidently deleted.)

This is the technique I use with the uAscend/MT TR setup. It should be able to be used with other “rocker” (lever) type primary (non-toothed) devices such as: Camp Lift; Ushba/Ural Alps Basic; CT Move; Kong Back-Up; Camp Goblin; and DMM Buddy. However, I’ve not tested it on any of them.

I developed this technique to simplify a retreat/descent from mid-route; from an overhang; and for routes where you are not able to easily reach the anchors and top out. One area where I climb the last 10’-15’ headwall, is 5.12+ territory which is above my pay-grade. (These routes are easily accessible from the top to set up TR anchors, and most of the route is well below that difficulty)


Prequisites 

  • uAscend/Camp Lift or equivalent primary devices
  • MicroTraxion/Spoc/or RollnLock (or equivalent backup)
  • Two independently anchored rope strands
  • A Grigri or equivalent ABD (assisted belay device) for descending


Advantages of this system

  • Less hassle because you never have to remove the primary or secondary devices (though you can still do that)
  • Less chance of dropping a device
  • There are always two devices on the rope protecting you while climbing, rappelling, or transitioning. Should you loose control of devices or ropes, there is redundancy for locking up
  • You can rappel at any point on the climb.
  • No xtra prusiks, rope grabs, ascenders necessary or personal anchor systems necessary.


Disadvantages

  • You still have to add/remove a GG (or equivalent) to rappel, (thus it is not as user friendly as using a Taz Lov, or Trango Cinch/Vergo or forth coming Sulu)
  • If free-hanging, you need to know how to do a foot-lock or foot wrap
  • You need to have access to access to two isolated strands of rope from the anchor (you can have both devices on a single strand, or one on each strand)
  • This method will not work with two toothed devices. It only works if the top one is a rocker type device. If you are using two toothed devices, see Derek Averill’s method.  

Technique

  1. Hang on the uAscend (top device)
  2. Rig GG on the other strand of rope
  3. Clip GG ‘biner through uAscend ‘biner and take-up rope slack till tight
  4. Lock open the MT or RollnLock backup device*
  5. Transfer your weight from the uAscend strand of rope to the GG strand by: 1)  grabbing both strands of rope with one hand above all the devices and pulling on GG strand, while; 2)  simultaneously taking weight off the uAscend strand. (If not at a stance or place where you can take the weight off the uAscend strand, you will need to do a foot lock or foot wrap)  3) pull up slack on the GG rope with the other hand and tighten to transfer your weight to it.  
  6. Grab both strands of rope together with one hand between the GG and uAscend OR grab the uAscend strand and spine of GG ‘biner. Either way your hand should rest on top of the uAscend so it can’t pivot up and lock. This is what allows it to easy be pushed/slide down the rope by the heel of your hand as you descend.  
  7. Open handle on GG with other hand and descend.


To climb again

  • Re-engage the back-up device
  • Transfer weight to uAscend strand of rope from the GG (if not on the ground and free-hanging, this will require a foot-lock again).
  • Remove GG from rope and clip to gear loop.
  • Climb away

Note: this is something that should be practiced on a tree in your backyard to gain proficiency before using at the crag. It sounds complicated but becomes quite easy with practice and even second nature with practice. YMMV


Monday, May 23, 2022

Best Feeding Top Rope Solo Setup

 Best Feeding Top Rope Solo Setup

Grandwall uAscend primary + MicroTrax backup


Yann Camus has recommended the Grandwall uAscend for a primary TRS device. I’d never tried one till recently. After using it for a while I feel that it is probably the best feeding device for TRS on the market...and I've tried most of them. If one is only concerned about the ultimate hands-free and safe TRS experience, the above setup is probably the best performing, safest, lightest weight, least critical re rope type/size, and cheapest setup at this point in time.

Many people getting into TRSing ponder what is the safest and best setup. It seems to be the perennial question. There's tons of advice on the internet but a lot of it leaves much to be desired and some of it is downright dangerous. For anyone getting started in TRS, you can't go wrong with this basic setup.


The downside is, a rappel device has to be added or swapped in/out when rappelling. If you have a hands free top out, this isn’t an issue. Or, if you leave a sling through the master point of the anchor that you can easy clip into while swapping devices. 


However, if you want to descend mid-route or have a hanging top out, it leaves much to be desired. In the next blog post I'll share an easy way to rappel using this setup just by adding a Grigri, without removing either the primary or backup TRS devices. 


Currently, the best setup for quickly descending, doing laps, lowering to work a crux, is still either the Taz Lov2/3 or the Trango Vergo that I’ve previously written about in my blog. Both devices allow descending at any point simply by hanging, locking out the back-up device, and pulling the handle on the primary device to descend. For ease of use and safety, the Taz Lov and Vergo are currently the best IMO. 


The compromise is, they don’t feed quite as well as the setup discussed here - you give up a slight bit in ease of feeding for convenience. Other compromises are: Taz Lov - the size, weight, and expense. The Vergo - feeds just slightly less than the Taz, though still much better than most other belaying/rapelling devices. Everything in TRS is a compromise. Set your goals, route, and parameters and decide which method and device is best for you.


The Ultimate TRS Feed Setup described above not only fulfills the goal of having the best feed but also the primary and back-up are two different types of devices. While having two of the same devices certainly works well (i.e. two MicroTraxs), best practice is to have a primary non-toothed cam/lever type device on top paired with a toothed device as a fail-safe back-up if the primary should fail for some reason.


Ultimate TRS feed set-up details:

  • Primary = Improvised chest sling harness (or breakable neck cord) + uAscend with added tow loop to hold vertically
  • Backup = MicroTrax on same strand of rope hanging down from belay loop (no need for dogbone on either)
  • Weight of an approach shoe cloved to the free end of the rope to facilitate feeding of devices. This allows you to quickly adjust as rope stretches and easily adjust the weight by putting in a rock or two.


Note: The MicroTrax, while an excellent device, also has its weaknesses: both locking on the rope when not wanted; and locking open when not wanted. I’ve experienced these multiple times. I’ve written about these failures and how to get around them (check check earlier blog post). The simplest solution without modifying the MT is to use a smaller diameter rope (< 9.6) that is not worn and fuzzy.


Descending:

  • Put the GG on the other strand of rope (or above the uAscend on the same rope)
  • Take the uAscend off the rope and let it hang free on the chest sling. 
  • Weight the GG
  • Lock open the MicroTrax
  • Descend on the GG.


NOTES

  1. I’ve found the improvised Suspend harness to be simple, easy, cheap and comfortable (or you can make a DIY Petzl Torse which is adjustable on the fly). If you are concerned about the harness configuration and the possibility of it exerting pressure on your neck in the event of a fall, instead of using a 1.5mm tow loop on the uAscend, you can make the tow loop out of 10 lb. test monofilament fish line so it will break at a known force. 

  2. The tow loop on the uAscend should only be attached to the orange non-moving plate (see photo). This allows you to put it on/off the rope on without having to take the device off the chest harness/neck loop. It also prevents you from dropping the device with putting on/off the rope and doesn't interfere with it's pivoting.
  3. To avoid the issues that I’ve experienced with the MT, I’ve ground off the lock-open nubin and use a thumb loop to manually hold it open while descending. See my blog for details.
  4. The Camp Lift is very similar to the GrandWall uAscend. However with one important difference. The cam lever spring is stiffer which causes more friction and thus doesn’t feed as well as the uAscend.
  5. The RollnLock can be substituted for the MicroTrax for a backup and is even cheaper and runs a bit smoother. HOWEVER, some have claimed issues with it locking up if it twists or if it collides with the primary device. I used it for multiple years and never had an issue using as a backup. Use at your own risk.
  6. With this setup, there is no reason to extend the top or bottom device. Some people get paranoid about the devices colliding. I’ve never had that happen and if it does, the MT will still engage because of the teeth.
  7. I use 9.5 ropes with all my devices. With this setup you can go up or down a bit in rope diameter. 10mm is plenty big and I’d not recommend going larger than that though I have used up to 10.2

ADDENDUM 

I know extend the upper device slightly with a very short sling. -just enough so the two devices can’t collide. Details here