

El Tacaño - GriGri Mods for
Lead Rope Solo
 |
| El Tacaño - GriGri Mods for Lead Rope Solo |
(The Cheapskate)
[updated 25 May, '23]
[updated 25 May, '23]
This is a summary of all my experiments and tinkering with modifying the GG for LRS. The naming is a nod to the El Mudo because it has the same basic functionality. If you aren’t a tinkerer and want the same functionality, then buy an El Mudo and support it's designer who is serving our community by constantly improving his design. It is a quality, bomber device made specifically for LRS and is probably the safest device available (with a back-up), and is reasonably priced compared to finding a used Soloist or Silent Partner at current eBay prices.
All my mods for LRS are way beyond the manufacture's designed purpose and will void any warranties; it may ruin your device; and are most likely dangerous for the inexperienced.
The goal of my tinkering is: better feed and immediate lock-up during weighting/falls. Said another way: I want it to be transparent in its feed and to be safe. I’m an old fart and risk adverse so I have no shame in setting a piece or clipping a bolt and hanging - I'm more into mileage and having fun than pushing myself then pushing my limits and getting something 'clean'. Given that, I do want to know that it's going to immediately lock-up. El Tacaño mods are good for minimizing fall distance on routes with objective hazards and /or cruxes low to ground. I'll leave the cutting edge stuff and big whippers to those like Brent Barghahn and Keita Kurkami who use similar systems but without some of the safety I've incorporated into my mods.
If none of my reasons apply to you...move along...just use a stock inverted GG 1, 2, or 3 which doesn't require any mods and 'should feed well'; 'should lock-up'. Note: none of these will lock up in a head-first fall so a backup is mandatory.
The following are 5 major versions of the mods starting with the easiest and least "destructive" of the stock GG. The degree of difficulty of the mods is directly proportional to the functionality of the device (ease of feed and immediate lock up):
1) GG+* - 2-strand HUB cord, (set to TR mode)
Feeds best with smaller diameter ropes, < 9.6 to mitigate friction. 2-Strand HUB cord - (Held Upside-down and Backwards) for connection to a chest harness. With this setup and the GG+ set to the top rope mode, it’s easier to lock up because it doesn’t have to flip up from hanging to vertical position. It's also easier for the climber to pull more rope for clipping because of higher position in relation to one’s body. This mod only requires one 1/8” hole to be drilled in pivoting side cover which doesn't weaken the GG; and doesn’t rely on holes in the plastic; no sharp edges; and keeps it away from handle. It can still be used for normal belaying. Allows centering of GG (side to side) and adjustment of the hang angle determined by where the overhand tow-loop is tied.
Because the rope tab on the cam arm puts an "S" bend in the rope, the 2-strand HUB cord allows you to fine tune and adjust the angle for the least possible friction possible with a given rope. It's a simple matter of re-tying the knot for the chest harness hang loop and adjusting the length of the arms to change the GG+ angle of hang. If the GG+ is oriented close to vertical, the rope friction can be too great. Close to horizontal there is little rope friction - almost too good as the back-feed can become as issue. Also, in this position it can lock up if you're climbing too fast or pull rope up instead of down to clip. The middle photo where it hangs at 45-50 deg. and slightly rubs on the rope tab gives a good middle ground. It can be a bit finicky to set it initially set up and use but it's easy to make adjustments.

Even though the spring in the GG+ is set to the TR mode it is quite weak but still requires a deliberate weighting on the rope to overcome the spring. I have heard of a some instances of it not locking up from a slow weighting from a high-clip position. Be sure to test on the ground and become familiar with the interplay of rope diameter and slow lock-up. This is what lead to #2 below where I disable the spring (GG3) and eliminate that possibility.

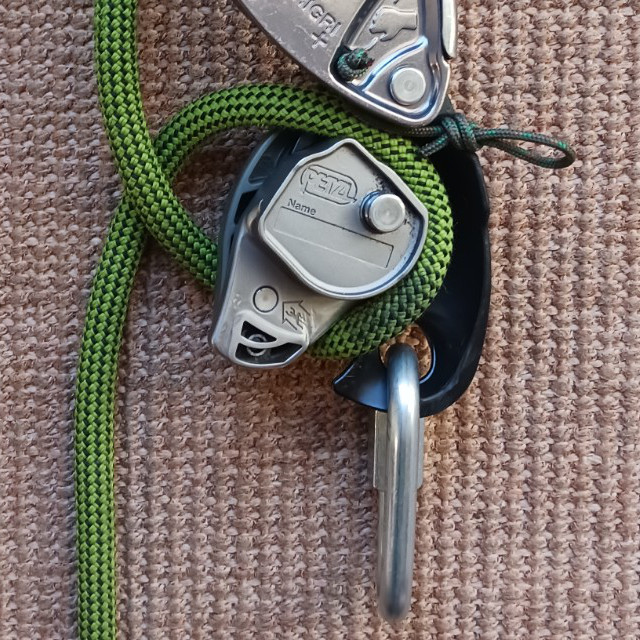
2) GG3 - 2-strand HUB cord; deactivated spring. Feeds best with smaller diameter ropes, < 9.6 to mitigate friction. This uses the same 2-strand HUB setup as above but uses a GG# in which the spring is Deactivated which allows the cam arm to pivot and lock on rope with the least downward movement of the climber. High clipping and/or “sitting” on the rope will always immediately lock-up. With the HUB cord there is no problem with the GG locking up. Because it’s held up vertically the rope feed is down away from locked position. However one needs to remember to pull slack down before clipping.However this is usually a natural action when leading - ‘pull down - clip up’. Should you pull directly up to do a high clip, it will immediately lock on you because of the deactivated spring.


3) GG3 - 2-strand HUB cord; deactivated spring; and ground down modified rope tab:The modified rope tab decreases the “S” bend in the rope which causes friction. This mod still protects against the rope getting caught underneath the cam arm because the tab is still functional though reduced in size. It is helpful to use in conjunction with 2-strand HUB cord to fine tune hang angle for most efficient feed.
Here I switched to a 1-strand HUB cord. Simpler to set up and holds GG closer to vertical. Because there is no rope tab it's not as critical to keep it at an optimal angle. With the 1-strand HUB cord it leans slightly because the one strand is a bit offset from the center of gravity of the GG. This might increase the drag slightly but is helpful in keeping the cord and chest harness connection away from GG handle - and it's also simpler to put on and take off. Because it’s using a GG+ the lock-up isn't as immediate as #2 and #3 above because it still has to overcome the spring in the TR mode.
A CAS (Cam Arm Shield) was also created because the standard GG rope tab is ground completely off to give a straighter rope path and decrease rope feed friction. Because of the tab is hollow, it leaves several small holes through to the guts of the handle. The CAS seals this off so nothing can get in to jam up the handle.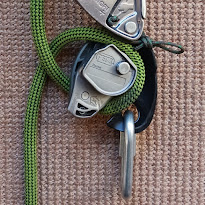 Without a CAS there is a risk of the rope getting caught underneath the cam arm and slicing the rope during a fall as shown to the right. The CAS is designed to make that an impossibility. It is fashioned out of a small piece of 25 gauge (0.5 mm) 304 stainless steel and JB Weld steel epoxy is used to glue it to the cam arm. This version is the smoothest feeding systems possible with a GG and is better than any other LRS system that I’ve tried which includes all the major LRS devices…it’s just unfortunate that it has the anti-panic handle - but I suppose if one wanted the best feeding GG for LRS, they could learn to live with and become efficient at using the anti-panic handle.
The following photo shows the cam arm shield before being attached with steel epoxy. It was a bit too wide so I eventually cut the width down after I'd already bent it and held it in place to see how it fit. A bit of trial and error.

Chamfered hole for the HUB cord. Since the photo was taken I have changed to drilling the hole on the sloping face just below where it is shown. This causes the cord to better exit at an angle between the cover and body into the existing gap between cover and body of the GG. This saves having to file the plastic spacer to create better clearance for the cord.
5) GG3 - single HUB cord, deactivated spring; ground-off rope tab; CAS (cam arm shield)
This version uses a GG3 and has the spring deactivated like in #s 2 and 3 above. However it has the rope tab on the cam arm completely ground off like #4 above. It also has a CAS with a new rope guide tab. This is necessary because with no spring resistance, when the rope feeds through around the cam, it tends to rotate it and which starts the locking-up process on the rope causing friction. This ultimately defeats the purpose of grinding off the tab in the first place. By incorporating a new rope tab into the CAS, the rope path can be straightened out, allowing for a straighter rope path than in #3. However, in the long run I think it’s not worth the extra work because the gains in friction reduction are minimal over #3 above. If one wanted the best feed possible in a GG for LRS, then #4 above is the choice. I haven't actually used this one yet but preliminary tests at home have convinced me that it it not worth the extra work even though it would seem the ultimate in rope feed and instant lock up. 


Here I switched to a 1-strand HUB cord. Simpler to set up and holds GG closer to vertical. Because there is no rope tab it's not as critical to keep it at an optimal angle. With the 1-strand HUB cord it leans slightly because the one strand is a bit offset from the center of gravity of the GG. This might increase the drag slightly but is helpful in keeping the cord and chest harness connection away from GG handle - and it's also simpler to put on and take off. Because it’s using a GG+ the lock-up isn't as immediate as #2 and #3 above because it still has to overcome the spring in the TR mode.

Chamfered hole for the HUB cord. Since the photo was taken I have changed to drilling the hole on the sloping face just below where it is shown. This causes the cord to better exit at an angle between the cover and body into the existing gap between cover and body of the GG. This saves having to file the plastic spacer to create better clearance for the cord.


This version uses a GG3 and has the spring deactivated like in #s 2 and 3 above. However it has the rope tab on the cam arm completely ground off like #4 above. It also has a CAS with a new rope guide tab. This is necessary because with no spring resistance, when the rope feeds through around the cam, it tends to rotate it and which starts the locking-up process on the rope causing friction. This ultimately defeats the purpose of grinding off the tab in the first place. By incorporating a new rope tab into the CAS, the rope path can be straightened out, allowing for a straighter rope path than in #3. However, in the long run I think it’s not worth the extra work because the gains in friction reduction are minimal over #3 above. If one wanted the best feed possible in a GG for LRS, then #4 above is the choice. I haven't actually used this one yet but preliminary tests at home have convinced me that it it not worth the extra work even though it would seem the ultimate in rope feed and instant lock up.

Additional mods:
The pivoting side plate was trimmed slightly and the edges were chamfered to increase opening clearance to decrease rope drag. This mod only applies to 3), 4) and 5) above. This is a minor mod but depending upon rope used, it can help with reducing the rope drag as well as provide a smoother and much more rounded opening where the rope will be rubbing when changing directions from feeding down while climbing, to pulling up during a fall.

 On several of the GGs, I shortened the length of GG handle by 3/8” - 1/2”. This provides more clearance of handle when cam arm pivots so it is less likely to catch on anything. It's interesting to note that the latest version of the Petzl Grillion (a version of the Grigri without a spring for use in an adjustable lanyard for rope work), also has a shorter handle than the GGs do. When the handle is shortened, it leaves a raw I-beam edge on the end that I filled with epoxy and then rounded and smoothed. For my small-medium fingers, it still leaves enough space to get 3 fingers on the handle to easily control the rap. I've never had an issue with handle interference so this is more of a preventative measure.
There you have it. Five major GG mods done over several years. It's kind of anal in scope and detail but then that's what I do. My favorites are #3 and #4 above though they all work.
LINKS


_________________
GG+* - while many people (including me) don't care for the anti-panic handle, and while it is a scourge for an experienced user, for those who want to make the most minimal modification to a GG and want to try a "safe" way to LRS (2-strand HUB cord), the GG+'s dual spring mode provides an acceptable way to try it out IMO. It should be set to the weak-spring (Top Rope) mode.
Note: While some of the photos often show an aluminum 'biner (which was handy to grab when shooting these photos), when actually using the El Tacaño I use a locking steel 'biner or a rated SS quick link.
Note 2: At some point I would love to take a couple of these and a weighted duffle/haul bag so it was rigged like a climber then push it over backwards off the top of a local cliff. This would simulate what a typical head-first fall might be like. It is typically said that a HUB rigged GGs won't catch a head first fall without a back-up. It could be tested both with and without a backup. Anyway, maybe in the future.
GG+* - while many people (including me) don't care for the anti-panic handle, and while it is a scourge for an experienced user, for those who want to make the most minimal modification to a GG and want to try a "safe" way to LRS (2-strand HUB cord), the GG+'s dual spring mode provides an acceptable way to try it out IMO. It should be set to the weak-spring (Top Rope) mode.
Note: While some of the photos often show an aluminum 'biner (which was handy to grab when shooting these photos), when actually using the El Tacaño I use a locking steel 'biner or a rated SS quick link.