
I'm finally getting around to finishing up the series on making the gBar. Hopefully if you've actually constructed one you've figured out a sling system to hang and be able to adjust it. However I'll finish out the series showing two methods for how I've done it. I'm sure there are other ways also. The sling loops needs to be adjustable and they need to be able to be flipped to the other side in order access all the grip positions that the bar is capable of. Note: both these methods are slightly different than the original photos posted.
The first slinging method is fairly simple but not quite as aesthetic and functionally not quite as good. In this method, you'll drill four holes through the bar as shown below. On one side the holes are 5/16" and on the other 3/16". The reason for this is to make the adjustment a bit easier on the side with the larger holes, while helping to secure the cord on the side with the knots so the cord doesn't slide around. The knots should be tied on the side with the smaller holes.


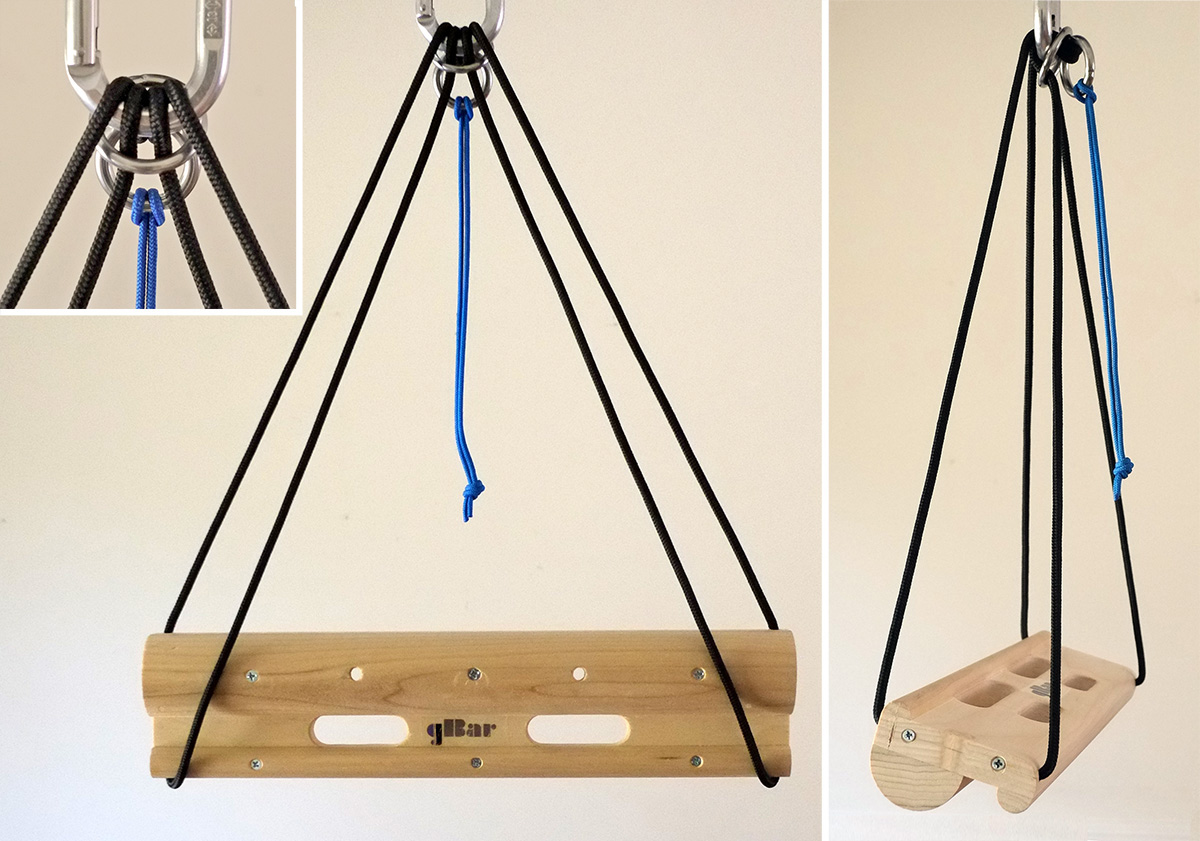
The second method, though a bit more complex, ends up being a bit nicer in appearance because there are no external knots and it's a bit easier to adjust because of the cord path. The 5/16" holes on one end are drilled as shown and consist of two holes drilled so that the cord path makes approximately a 45 deg. bend. The 3/16" holes are drilled on the other end. Then perpendicular to the cord path two countersunk 1/16" holes for 1" #6 wood screws. Instead of the knots securing the end, the ends are inserted into their respective holed and then secured with the wood screws giving a nice clean finish.


It's possible to use 6mm cord instead of 5mm but all holes will need to be increased slightly in size.
When using the gBar the different grip types are accessed by changing the relative size of the hang loops by sliding the cord though the bar on the side where it it free to slide. Also for some of the grip positions you'll need to flip the cords to the other side of the bar.
Here's a summary of the grips available on the gBar the position/angle the bar needs to be adjust to:

Any of the grip positions can be made harder or easier by adjusting the sling slightly to change the hang angle.
Update
The gBar can also be made with the RipCord quick release adjustment system used by the Gstring PROs. This would allow you to quickly adjust the angle of the bar/type of grip without having to remove the bar from its mount.You will need 2 x 3 feet pieces of 5mm accessory cord. More if you want it to hang lower. Use the screw method for securing the ends of the cord as described above. For the rest of the instructions, follow steps #8-19 from our previous post on the Quick Release system. Thread both rings onto both cords together instead of crossing them as described.
The result should end up looking like this:
To access all the grips positions, for some you will need to flips the bottom cords around the ends while it is hanging.
Update #2
I am now experimenting with making them as follows. It includes all the grip positions of the original but makes the three-finger pockets into two-finger pockets (duos) and adds monos. The monos are drilled 1.5" deep and since it's positioned to take advantage of the 5/8" rounded crimper, it gives it a "comfort" edge and increase the depth slightly. The bar is now a full 18" wide compared to the shorter 15" bar above. Notice the slight change in position of the top cord holes to make it slightly more functional.
This same layout could be further modified by adding a one-arm mono and one-arm duo in the center of the board if you're strong enough to train train them. That's above my "pay grade" so I'll leave it to you beasts out there to add those.
If you have any questions, feel free to ask.
The next do-it-yourself project will be a set of grips that are super simple and cheap to make out of plywood and PVC pipe.