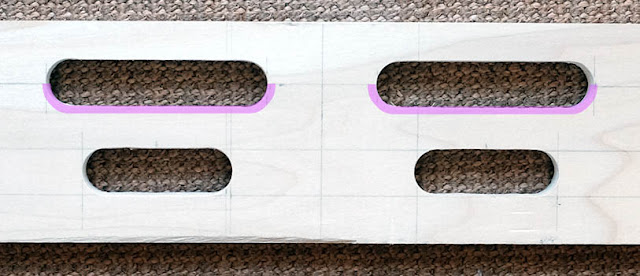
Materials: I used poplar wood throughout obtained at a local hardware store. 3/4" birch plywood could be used instead of the solid 3/4" poplar plank.
Note: the width of the finger slots/holes/pockets are all 3/4". If you have large fingers, you may want to increase their size to 7/8" or 1" to fit your fingers. If you use a larger size , make sure you increase the overall width of the board accordingly.
Dowels were bought from local hardware store and cut in half. To do this you need a table or band saw. It's also possible cut the 2" dia. dowel in half with a hand saw but that would be tricky. Here is a link to a simple jig that can be used to safely cut the dowels in half length-wise on a table saw. A Google search will yield other jigs for use with a bandsaw.
If you don't have access to a table or band saw it's possible to buy half-rounds from various wood suppliers. The 3/4" half-rounds can often be obtain in the molding/trim section of a large hardware store.
All dimensions for constructing the gBar are listed (or can be inferred from) on the dimensioned drawing in the previous post.
Here is the step-by-step process:
- Cut the 3/4" x 3.5" x 18" base board of the bar
- Cut the three dowels to 18" in length then slice/cut in half
- Round one edge of the base board to 1/2" radius. I used a router for this but could be done easily by hand with a file/rasp/plane/ or sandpaper.
- Layout with pencil on the board where the finger slots and dowels will go making sure that the rounded edge (of step #3 above) is on the opposite side of where the 3/4" half-round dowel will go.
- Cut the finger slots: I used a drill press to cut these holes by using a fence and repeatedly drilling a series of holes until the desired length of each finger slot is obtained. This is slow and tedious but if done carefully can yield good finger slot. You could also use a plunge router which be easier and give a nicely finished slot. If you don't have a router or drill press, you could use a hand drill to drill a 3/4" hole at each end of each finger slot. Then use a reciprocating saw or hand coping saw to cut out the material between the holes.
- Radius the bottom edge of the finger slots that will be on the back side of the board. I used a 1/4" radius router bit but this can easily be done by hand. The goal is to get a radius that will be comfortable on your fingers when hanging. The top part of the finger pocket will be be radiused by the 5/8" dowel
- Attach the 2" half-round dowel to the base board. Use 3 #6 1-1/2" wood screws and wood glue. I used wood clamps to hold in position while I pre-drilled slightly smaller holes for the wood screws. If you measured and cut correctly, the edge of the 2" half-round should line up with the edge of the finger slot and the edge of the board.
- Do the same with the 3/4" half round dowel except use 3 - #6 x 1" wood screws. This should line up with the other edge of the finger slot and the other edge of the board.
- Attach the 5/8" half-round on the back side of the board. I did this with the 6 - 3d 1-1/4" finish nails and glue.
- This photo show optional holes drilled in the finger pockets to increase the depth for monos by 1/2"-3/4" more. It also shows optional 1/4" hole drilled in the middle of the finger pocket to help facilitate pushing the shims out from the other side if they are used.
- Shims can easily be made by trimming 3/4" craft sticks/tongue depressors with scissors and then smoothing with sandpaper. In use, this allows you to increase the difficultly by 1mm at a time. They can also be created with non-corrogated cardboard. Layers can be glued together to make the thickness desired or they can be used with double-sided cellophane tape to adjust on the fly...or if they are trimmed carefully they can have a press fit and then pushed from the other side via the optional access holes shown above.All packed and ready to go in my carry-on...
Next blog I'll cover two different ways to sling and adjust the bar.


No comments:
Post a Comment