Sunday, November 27, 2016

gBar: A Do-It-Yourself Hang-Bar - Part 2

Materials: I used poplar wood throughout obtained at a local hardware store. 3/4" birch plywood could be used instead of the solid 3/4" poplar plank.

Note: the width of the finger slots/holes/pockets are all 3/4". If you have large fingers, you may want to increase their size to 7/8" or 1" to fit your fingers. If you use a larger size , make sure you increase the overall width of the board accordingly.

Dowels were bought from local hardware store and cut in half. To do this you need a table or band saw. It's also possible cut the 2" dia. dowel in half with a hand saw but that would be tricky. Here is a link to a simple jig that can be used to safely cut the dowels in half length-wise on a table saw. A Google search will yield other jigs for use with a bandsaw.

If you don't have access to a table or band saw it's possible to buy half-rounds from various wood suppliers. The 3/4" half-rounds can often be obtain in the molding/trim section of a large hardware store.

All dimensions for constructing the gBar are listed (or can be inferred from) on the dimensioned drawing in the previous post.

Here is the step-by-step process:
  1. Cut the 3/4" x 3.5" x 18" base board of the bar
  2. Cut the three dowels to 18" in length then slice/cut in half
  3. Round one edge of the base board to 1/2" radius. I used a router for this but could be done easily by hand with a file/rasp/plane/ or sandpaper.


  4. Layout with pencil on the board where the finger slots and dowels will go making sure that the rounded edge (of step #3 above) is on the opposite side of where the 3/4" half-round dowel will go.
  5. Cut the finger slots: I used a drill press to cut these holes by using a fence and repeatedly drilling a series of holes until the desired length of each finger slot is obtained. This is slow and tedious but if done carefully can yield good finger slot. You could also use a plunge router which be easier and give a nicely finished slot. If you don't have a router or drill press, you could use a hand drill to drill a 3/4" hole at each end of each finger slot. Then use a reciprocating saw or hand coping saw to cut out the material between the holes.
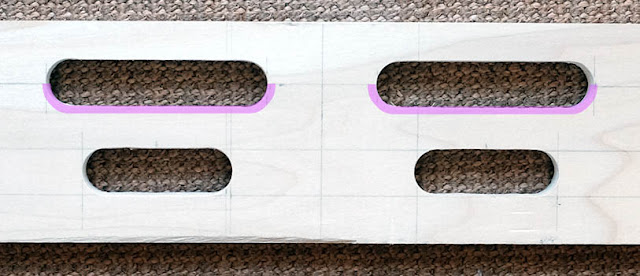
  6. Radius the bottom edge of the finger slots that will be on the back side of the board. I used a 1/4" radius router bit but this can easily be done by hand. The goal is to get a radius that will be comfortable on your fingers when hanging. The top part of the finger pocket will be be radiused by the 5/8" dowel


  7. Attach the 2" half-round dowel to the base board. Use 3 #6 1-1/2" wood screws and wood glue. I used wood clamps to hold in position while I pre-drilled slightly smaller holes for the wood screws. If you measured and cut correctly, the edge of the 2" half-round should line up with the edge of the finger slot and the edge of the board.


  8. Do the same with the 3/4" half round dowel except use 3 - #6 x 1" wood screws. This should line up with the other edge of the finger slot and the other edge of the board.
  9. Attach the 5/8" half-round on the back side of the board. I did this with the 6 - 3d 1-1/4" finish nails and glue.
  10. This photo show optional holes drilled in the finger pockets to increase the depth for monos by 1/2"-3/4" more. It also shows optional 1/4" hole drilled in the middle of the finger pocket to help facilitate pushing the shims out from the other side if they are used.


  11. Shims can easily be made by trimming 3/4" craft sticks/tongue depressors with scissors and then smoothing with sandpaper. In use, this allows you to increase the difficultly by 1mm at a time. They can also be created with non-corrogated cardboard. Layers can be glued together to make the thickness desired or they can be used with double-sided cellophane tape to adjust on the fly...or if they are trimmed carefully they can have a press fit and then pushed from the other side via the optional access holes shown above.


    All packed and ready to go in my carry-on...


Next blog I'll cover two different ways to sling and adjust the bar.

Tuesday, November 1, 2016

gBar: A Do-It-Yourself Hang-Bar - Part 1


This will be four-part series that gives an overview of how to make the gBar portable training bar. It is an incredibly versatile hang bar that utilizes both sides of the board, has adjustable 360 degree angle around the horizontal axis, and hangs from a single point. It can be made for as little as $15, depending upon materials you have on hand, tools available, and your skill level. It combines some of the features we've used on our Gstrings, Pocket Rocks and Contiuum Boards and offers the following grip positions: 
  • jug
  • half hand flat edge or flat sloper
  • 2" finger sloper
  • 3/4" edge (adjustable depth via shims)
  • 1/2" edge (adjustable depth via shims)
  • 1" - comfort edged 1/2/3 finger pocket
  • 1.7" - comfort edged 1/2/3 finger pocket 
  • 5/8" rounded crimp sloper
  • 3/4" rounded crimp sloper
  • 1/2" and 3/4" flat edges can be modified for depth using shims to make the edges as small as desired.
The rounded crimps & slopers can be made easier or harder by changing the angle of the bar. This changes the surface contact area of the fingers on the grip. In the same way, edges, pockets and the flat sloper can also be made easier or harder.

The bar is 3.5" x 18" and weighs ~1.5 lb. depending upon what type of wood you use and the density of it. The bar can easily be modified to suit your needs and desires. This is what works for me and a starting point for your creativity!

There are a number of portable training bars/boards on the market already. If you don't have the skills to make one, then check these out...or our Gstring or Pocket Rock climbing grips:

An important caveat: If you have shoulder or elbow problems or have had tendonitis, consider using individual grips that can rotate around the vertical axis. This allows more flexibility in elbow/shoulder position than a bar/board type of device where both hands are always in the same plane. If you are training with repeaters, use additional weight, or do long intensive training sessions, it can lead to repetitive stress type of injuries. If you think this is, or could be an issue for you, check out our grips at sic.grips.com - they are infinitely adjustable in all planes and allow the most comfort in training.
This first blog post will give an overview; dimensions, and materials. The second blog post will give basic construction advice; the third post will describe different ways of slinging it; and the final post will give pointers on how to use it.


the basic ingredients ready to be assembled

Materials:
  • 18" x 3.5" x 3/4" plank (poplar, birch plywood or other hardwood)
  • 2" half round dowel (2" x 1" x 18") - poplar, birch other other hardwood
  • 3/4" half round dowel (3/4" x 3/8" x 18") - poplar, birch other other hardwood
  • 5/8" half round dowel  (5/8" x 5/16") - poplar, birch other other hardwood
---------------------------------------------------
  • 3 - #6 - 1.5" wood screws
  • 3 - #6 - 1" wood screws
  • 6 - 3d 1.25" finish nails
---------------------------------------------------
  • 7'-8' - 5mm or 6mm accessory cord
---------------------------------------------------
  • wood glue

Tools:

Minimally you will need a hand saw, drill and hammer. If you can not obtain or have someone halve the dowels for you lengthwise, you will need a table or band saw to slice the dowels in half length-wise.

PS - in case it was not obvious, the name for the bar came from the "g" cross section of the bar. Several people who've tried it did not immediately make the connection.

    Thursday, May 5, 2016

    Portable Training Tripod


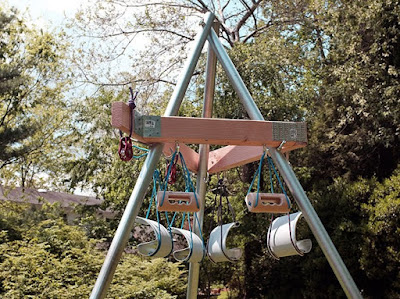
    The Training Tripod is a portable stand for making a workout station for hangboards, hanging portable climbing holds, or other training devices. The idea was adapted from Tom Linder's original idea over on Training Beta's Blog. We have used it at climbing festivals to showcase our training products and allow people to try them, as well as running dead-hang comps as a fund raiser for the American Alpine Club.


    The main differences between mine and Tom's are that it collapses to 5' for travel and has the wooden triangle hanger which provides three sides from which to hang training devices. It also helps set the correct leg spacing each time the tripod is set up. I suggest that your read his description first on how to create the Training Tripod and then decide if you'd like to make the collapsible version with 3 training stations.


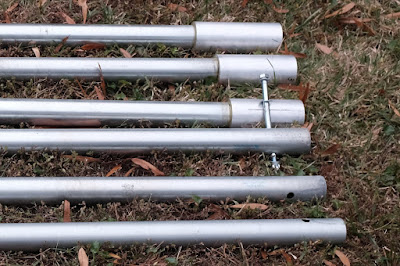
    The tripod is made out of 10' section of 1.5" diameter conduit pipe. Each leg is cut in half and a 3/16" wall 1.5" i.d. x 6" long aluminum pipes epoxied to one end of each of the legs. This provides a slip-fit joint which is held in place by gravity when assemble and makes setting up and taking down a snap. I tried originally using 1.5" conduit joints but they were too short and the fit too sloppy to provide a decent joint. I obtained the aluminum pipe from a friend's machine shop.


    The top joint is held together by 3/8" carriage bolt, several washers, a lock washer, and a wing nut. The holes drilled are 1/2" to allow a bit of play which makes it easier to set up and adjust. The measurements for drilling the holes are: Middle tube - both holes are 2/14" from the end.
    Side tubes - one hole is 2 1/4" from the end; the other is 2 3/4" from the end.


    The stops for the wooden tripod to rest on are 3/8" x 3 1/2" carriage bolts with washers and a lock nut. The holes for them are drilled 26" from the end of the top half of each tripod leg. However, this is totally dependent upon how high you want the wooden triangle to be mounted. I suggest making and setting up the basic tripod without the wooden triangle so you can determine how high up off the ground you want it, then drill the holes accordingly for each leg.


    The wooden tripod is made out of 2x4 lumber measured and cut to fit once the tripod is set up and the desired angle achieved. Make sure before making the measurement for the wooden triangle that each leg of the tripod are equal distance from each other. Each leg of the wooden triangle is approximately 23" except for one leg that was left longer so that a weight reduction pulley system could eventually be mounted which is 30" long. This was cut longer so the suspended weight would not interfere with the climber. Each angled end is cut at 60 degrees.


    This was the trickiest part to make because the length of each leg will determine what angle the assembled tripod sits at. Measure twice (or three times) and cut once! The desired angle between each of the wooden braces is 60 degrees to form an equilateral triangle.


    The wooden triangle mount is held together with 2 #10 3-1/2"wood screws in each end and then 3-1/8-in x 7-in nail plates and mending plates.


    The Training Tripod could easily be created without this part as Lindner did if you intend to only mount one item at a time such as a hangboard. This would make construction significantly easier. See his description for how they mounted a hangboard that was easy to swap out for other training boards. We decided to use the wooden triangle mount so that we could use the tripod for climbing festivals to display and use three products at once and have multiple people using them.


    We added J-bolts drilled through the width of each leg of the wooden triangle so that they were free to pivot into place and "hook" the bolts on the tripod leg that it rests on. This "locks" it into place so that when in use the triangle won't move or be flipped up by weighting the opposite side. Each side of the wooden mounting triangle had had one J-bolt corresponding to the tripod bolt that it was resting on.


    1/2" holes for ground stakes - optional if you're going to use the tripod on a lawn or in the dirt.  This will keep keep the tripod from shifting around. Use a solid spike or tent peg.


    Assembled tripod with weight reduction pulleys temporarily hung with accessory cord.  Eye bolts will be added later to make a permanent mount for the pulleys.


    The tripod with Crack Rack, Pocket Rocks, and Gstrings hung and ready to use. The Crack Rack is mounted to a 2x10 backing board that has two 3/8" open-eye lag screws so that it can be quickly hung or removed from 3/8" bolts in the wooden triangle. The bottom of the 2x10 was shaved off at an angle so the board would sit vertically when hung. The same mounting system could be used for a hang board or board with climbing holds mounted to it.


    Additional thoughts and ideas:

    If you are going to use the tripod on cement or asphalt, it might be worthwhile considering putting 1/4" bolts through the bottom of each leg and then connecting it with vinyl coated braided wire. This would also help in setting it up by setting the correct distance that the legs are able to spread and thus the correct angles for the tripod. I would also consider cutting the ends of the legs so that they would sit flush on the ground.

    I've toyed with the idea of eliminating one of the legs and substituting a pair of 2x10s spaced by 3/8' bolts to make an adjustable crack. I'd have to eliminate the wood triangle and figure out another way to mount the products. This would add versatility but would definitely increase the hassle in moving and transporting. For portable crack training it's much easier to use our prototype Crack Rack so we'll probably will not go this route.

    Stay tuned - we'll also be publishing some plans for how to make your own simplified version of the Crack Rack called the Squeeze Box. It is relatively simple to make based on using a pair of wood clamps, is easily adjustable and can be hung most anywhere.

    Friday, January 15, 2016

    Pocket Rocks Update

    We just finished a short video clip about the features and grip positions offered by Pocket Rocks. Have a look. We hope to have them available (finally) the end of February or beginning of March.